Keeping your water bottles and bladders from developing mold

Mold in reusable water bottles and hydration bladders is a common frustration for hikers, runners, and cyclists. Because these containers are constantly exposed to moisture and dark storage spaces, they become the perfect breeding ground for bacteria and fungi. This leads to “funky” tasting water, musty odors, and potential health risks.
The key to a mold-free experience isn’t just washing—it is proper mechanical scrubbing and total dehydration.
Why mold grows in water bottles and hydration packs
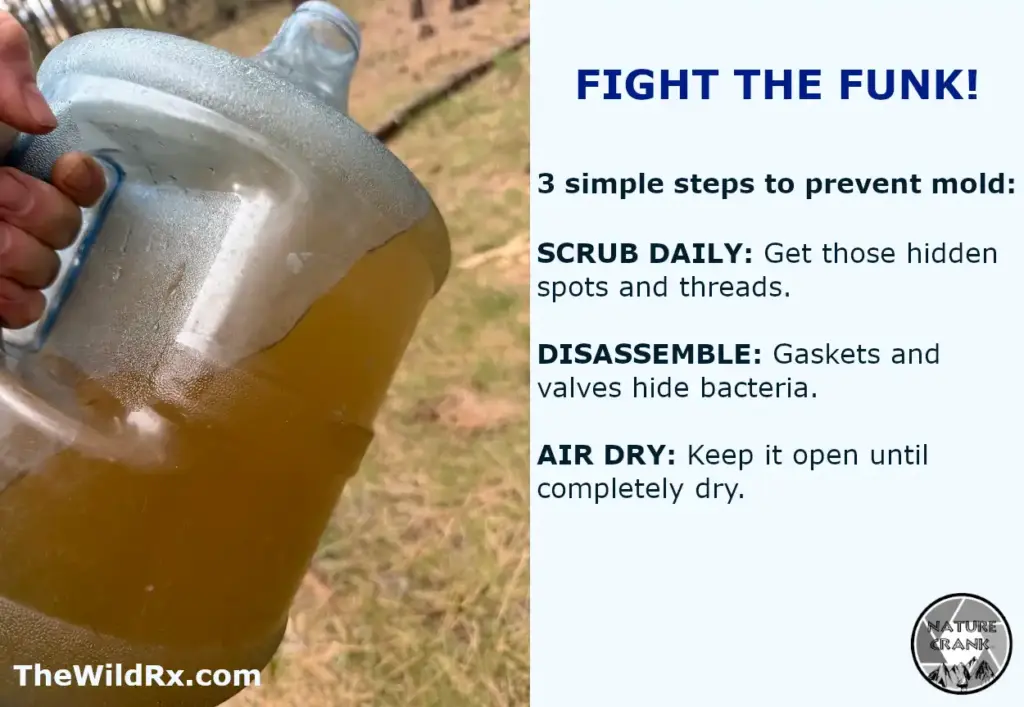
Mold thrives on moisture, darkness, and organic matter. When you drink, saliva residue and backwash enter the container. It is important to remember that most of the time, a dirty bottle or hydration bag won’t be obviously dirty like the jug below; early mold growth and bacteria are often invisible to the naked eye, meaning you can’t see the “dirty little guys” until a colony is well-established. In fact, research published in the Journal of Civil and Environmental Engineering found that bacteria levels in reusable bottles can reach 1–2 million counts per mL in just one day.
If you use electrolyte powders or sugary sports drinks, you are providing “food” for mold spores. Using sugar-free packets will often lower the speed at which microbes grow, but some molds and bacteria use ‘artificial sugars’ and sugar alcohols as food — especially once the liquid makes contact with organic material (like spit and food particles). So, do take time to rinse out your water bottles on the trail.
Common problem areas include:
- Bottle threads: The grooves where the lid screws on.
- Bite valves: The silicone tip of a hydration bladder.
- The “dead zone”: The bottom of a hydration bladder where water pools.
- Drinking tubes: Long, narrow hoses that are difficult for air to reach.
Comparison of cleaning methods: Water bottles vs. hydration bladders
| Feature | Reusable water bottles | Hydration bladders (Reservoirs) |
| Primary risk area | Lid gaskets and straws | Drinking tubes and bite valves |
| Daily maintenance | Hot soapy water rinse | Flush tube and hang to dry |
| Deep clean frequency | Weekly (or after every trail run) | Every 3–5 uses |
| Recommended agent | White vinegar or dish soap | Bottle cleaning tablets or baking soda |
| Drying technique | Upside down on a drying rack | Use a reservoir hanger or “prop” open |
Daily habits to keep your water bottle mold-free
To avoid the need for harsh chemicals later, implement these daily steps to prevent biofilm buildup:
- Rinse immediately: Don’t let a half-full bottle sit in your gym bag or car overnight.
- Disassemble everything: Remove the straw, the silicone O-ring (gasket), and the bite valve. Mold often hides under the rubber seals.
- Use a dedicated bottle brush: Standard sponges cannot reach the bottom corners effectively. Adding a small scrub brush to your essential repair and maintenance tools for backpacking ensures you can handle hygiene issues in the field.
- Prioritize airflow: Never store a bottle with the cap on. Air must circulate to ensure the interior is bone-dry.
How to deep clean a hydration bladder and tube
Cleaning a hydration pack requires a more tactical approach than a standard bottle. If you see black spots in your tube, follow these steps:
- The baking soda soak: Fill the bladder with warm water and 2 tablespoons of baking soda. Shake it and lift the bladder so the solution runs through the tube. Let it sit for 30 minutes.
- The vinegar method: For mineral buildup or odors, use a 1:4 ratio of white vinegar to water.
- Mechanical cleaning: Use a flexible “snake brush” specifically designed for hydration tubes. This is the only way to physically break up mold colonies inside the hose.
- The freezer hack: After cleaning and drying, consider storing your empty bladders in the freezer. Cold temperatures prevent any remaining spores from multiplying.
Expert tips for drying your gear
Drying is the most overlooked step in water bottle maintenance. If the container is even slightly damp when you close it, mold will return. Keeping your gear dry is just one part of the dirty reality of off-grid living and backpacking.
- For bottles: Use a drying rack that holds the bottle at an angle so air can enter.
- For bladders: Use a “reservoir dryer” or a clean kitchen whisk inserted into the bladder to keep the sides from sticking together.
- For tubes: Swing the tube in a circle (centrifugal force) to sling excess water out of the line.
Post-hike hydration gear checklist
Immediate steps (at the trailhead or in the car)
- Empty the remaining liquid: Do not leave half-full bladders or bottles in a hot car, as heat accelerates mold growth.
- Blow air through the tube: If using a bladder, blow air back into the bite valve to push standing water out of the tube and back into the reservoir for easier emptying later.
Cleaning steps (at home)
- Disassemble all components: Pull off the bite valve, remove the straw from the lid, and pop out any silicone gaskets or O-rings.
- Perform a hot soapy rinse: Use warm water and mild dish soap to rinse all parts.
- Scrub the “problem zones”: Use a bottle brush for the base and a snake brush for the hydration tube.
- Flush the system: Run clean water through the tube and bite valve until no soap bubbles remain.
Drying and storage (the most critical part)
- Prop the bladder open: Use a reservoir hanger, a kitchen whisk, or even a clean plastic coat hanger to keep the sides of the bladder from touching.
- Invert the bottles: Place bottles at an angle on a drying rack to ensure air can circulate inside.
- The “centrifugal” tube dry: Swing the hydration tube in a wide circle to sling out any stubborn droplets trapped in the line.
- The “bone-dry” test: Check the bite valve and the bottom corners of the bladder. If you see any condensation, let it air out for another few hours.
- Freeze for safety: Once completely dry, store the bladder in the freezer to keep it sterile until your next adventure.
Choosing a “low-maintenance” bottle or bladder
If you are tired of scrubbing tiny crevices, the best defense is buying gear designed for easy access. Not all containers are created equal when it comes to hygiene.
Features to look for in a hydration bladder
- Fold-top sliders: Brands like HydraPak and Cnoc (Vecto series) use a sliding top that opens the entire width of the reservoir. This allows you to stick your whole hand inside to scrub and, more importantly, makes it possible to flip the bladder completely inside out for drying.
- Quick-disconnect hoses: Look for “click-in” tube connections (standard on Osprey Hydraulics and CamelBak Crux). This allows you to remove the tube for a separate deep clean without having to unthread it from your backpack.
- Baffles that “prop” open: Some modern reservoirs, like the Gregory 3D Hydro, have a built-in semi-rigid structure that keeps the bladder from collapsing on itself while drying.
The best water bottle designs for mold prevention
- Wide-mouth openings: A standard Nalgene or a wide-mouth Hydro Flask is far superior to narrow-mouth bottles. If you can fit a standard kitchen sponge or a large bottle brush inside, you are much more likely to keep it clean.
- Stainless steel vs. plastic: Stainless steel (like YETI or Klean Kanteen) is non-porous, meaning it doesn’t “hold on” to odors or bacteria as easily as plastic. However, avoid bottles with complex “chug caps” or “straw lids” if you want the lowest maintenance possible—simple screw-top lids are the easiest to sanitize.
- Glass for flavor purists: If you use your bottle for tea or flavored electrolytes, glass (like Lifefactory) is the most mold-resistant material because it is completely inert and dishwasher-safe at high temperatures.
Top brand recommendations for easy cleaning
| Brand/Model | Best for… | Why it’s easy to clean |
| HydraPak Contour | Hiking/Running | Can be turned inside out; dishwasher safe. |
| YETI Rambler | Everyday use | Over-engineered threads and simple, dishwasher-safe lids. |
| Cnoc VectoX | Backpacking | Dual-opening design allows for easy filling and drying. |
| Nalgene Wide-Mouth | Budget/Durability | Zero hidden crevices; fits almost any bottle brush. |
Hydration gear red flags: What to avoid if you hate mold
If your goal is to minimize cleaning time, avoid these common design features that act as “magnets” for bacteria and mold. Many high-end brands use these for convenience, but they come at a high hygienic cost.
1. Integrated “hidden” straws
Lids with built-in straws that flip up or down are a cleaning nightmare. The internal mechanism often contains small plastic hinges and silicone valves that are nearly impossible to reach with a brush.
- The risk: Biofilm builds up inside the straw housing, leading to a “musty” taste every time you sip.
- The fix: Stick to simple screw-top lids or “chug” style caps with wide, accessible openings.
2. Complex “one-click” trigger lids
Coffee mugs and water bottles with “autoseal” buttons (common in brands like Contigo) have spring-loaded internal parts. Unless the lid is specifically designed to “pop open” for cleaning, you can never truly see or scrub the gunk trapped around the spring.
- The risk: Old coffee or electrolyte residue can harden inside the mechanism, creating a permanent breeding ground for bacteria.
3. Non-removable silicone gaskets
Almost every leak-proof bottle uses a silicone O-ring or gasket. The red flag is when that gasket is deeply recessed or glued in. If you can’t easily pop it out with a spoon handle, you can’t clean behind it.
- The risk: This is the #1 cause of the “mildew smell” in otherwise clean-looking bottles.
4. Narrow-neck “bottleneck” designs
Bottles with a very small opening (like the classic S’well shape) look sleek, but they prevent you from seeing the bottom of the bottle. If you can’t see the bottom, you can’t see the mold.
- The risk: You might be drinking from a moldy container for weeks without realizing it.
- The fix: If you love the narrow-neck look, only use them for plain water—never for sugary drinks or powders.
5. Opaque or “smoke” colored bladders
While dark-colored hydration bladders look tactical, they hide dirt and mold. A clear or transparent reservoir is always the better choice for maintenance.
- The risk: You may miss the early signs of “black spot” mold growth until the colony is large enough to affect the taste of your water. A study led by Purdue University researchers discovered that over 20% of sampled reusable bottles contained coliform bacteria, reinforcing the need for clear reservoirs that allow for easy visual inspection.
Red flag summary: The “cleanability” checklist
Before you hit “buy” on that new bottle, ask yourself these three questions:
- Can I see every interior surface with my own eyes?
- Can I fit a standard bottle brush through the opening?
- Do the silicone seals come out easily for a vinegar soak?
If the answer to any of these is “no,” you are likely buying a future mold problem.
Frequently asked questions: Keeping hydration gear clean
Conclusion: Staying ahead of the mold
Keeping your hydration gear clean is less about the deep scrub and more about the daily dry. For a complete look at managing your intake on the trail, see our Backcountry water and food: Complete guide to self-sufficient hiking.
By implementing a consistent routine—disassembling your lids and utilizing the “freezer hack”—you can extend the life of your equipment and ensure every sip is fresh.
Join the conversation: How do you keep your gear fresh?
We want to hear from the community! Do you have a “secret weapon” for drying out a stubborn hydration bladder, or a favorite brand that never seems to get funky?
- Leave a comment below with your best cleaning hack or a question about a specific bottle.
- Share this guide with your hiking or cycling group to help everyone stay mold-free this season.
- Tag us on social media with a photo of your “drying rack setup”—the more creative, the better!
Discover more from The Wild Rx aka NatureCrank™
Subscribe to get the latest posts sent to your email.