Injury prevention for hikers: How to avoid and manage common trail problems
Hiking offers incredible rewards (the views, mental rejuvenation, etc), but uneven terrain, long distances, and repetitive stress can lead to issues that cut trips short—or leave you hobbling to the bathroom for a week. This guide covers practical ways to stay healthy on the trail with clear steps for preventing and handling the most frequent problems hikers face. Whether you’re planning casual day hikes or grueling multi-day treks, these strategies help you build resilience and respond quickly when your body starts sending those early warning signals.
Why injury prevention matters on hikes
Most hiking mishaps aren’t dramatic mountain rescues; they’re “death by a thousand cuts” (or one really mean blister). Common culprits include blister friction, downhill knee crunch, and strains from weak stabilizing muscles that decided to clock out early.
Addressing these early keeps you moving and saves you from a lengthy recovery on the couch. Focus on gradual training, proper equipment, and actually listening to your body to lower your risks. Trust me, your knees will thank you in twenty years.
Build a strong foundation before you hit the trail
Think of your body as a high-performance vehicle. You wouldn’t take a car with bald tires and a shaky transmission on a cross-country road trip, right? Conditioning is your first line of defense against overuse injuries.
- Strength training: You want a “trail-ready” lower body. Target your glutes, quads, hamstrings, and calves. Exercises like squats, lunges, and single-leg balances help you stay upright when you inevitably trip over a hidden root (ha, we’ve all been there).
- The 10% rule: Don’t boost your weekly mileage or elevation by more than 10% at a time. Your ambition might want a 20-miler, but your Achilles tendon begs to differ.
- Warm-up and mobility: Give yourself five minutes of “dynamic” movement before the climb. Ankle circles and leg swings tell your nervous system that it’s time to work.
- Balance work: Practice standing on one leg while brushing your teeth. It sounds silly, but it builds the tiny stabilizing muscles that prevent nasty ankle sprains.
- Don’t forget the doggos: Physical prep for hiking isn’t just for you. Be sure that you adequately prepare your dog for treks.
- Mental prep: Beyond the physical, it’s also vital to prepare for the psychological demands of the trail—check out my thru-hiker’s mental health guide to learn how to handle everything from pre-trip jitters to post-trail depression.
Pro-tip: Trekking poles are a literal game-changer. They can reduce knee stress on descents by up to 25%. Think of them as four-wheel drive for your legs.
Choose the right gear to minimize risk
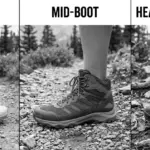
The wrong gear turns a great day into a survival mission. When it comes to foot injuries while hiking, your sock-and-shoe combo is your most important investment. If you’re struggling to decide between support and speed, see my guide on finding your ultimate hiking footwear to compare boots versus trail runners. Additionally, carrying a balanced load is key to avoiding back strain; I’ve rounded up the best backpacking tents, sleep systems, and packs for 2026 to help you keep your base weight low.
Essential gear for injury prevention
| Item | Why it helps | Recommendation |
| Hiking boots/shoes | Traction and support | Buy them half a size up to allow for foot swelling |
| Moisture-wicking socks | Stops trench foot; helps prevent blisters and maceration | Merino wool or synthetic blends; never cotton |
| Trekking poles | Saves your joints | Adjustable poles with comfortable grips |
| Blister kit | The “oh no” fix | Moleskin, Leukotape, and antiseptic |
| Supportive insoles | Shock absorption | Look for brands like Superfeet for better arch support |
Managing blisters while hiking
Blisters are the universal hiker tax, usually caused by heat, moisture, and friction.
How to prevent blisters
- Break in those boots: Please, for the love of your heels, don’t wear brand-new boots on a summit push.
- Dry is fly: If you dunk your foot in a creek, stop and change your socks. Wet skin is weak skin.
- Lacing tricks: Use a “heel lock” lacing pattern to keep your foot from sliding forward and crushing your toes on the downhill.
- Fix “hot spots” early: If you feel a sting, stop now. Slap some Leukotape on it before it becomes a bubble.
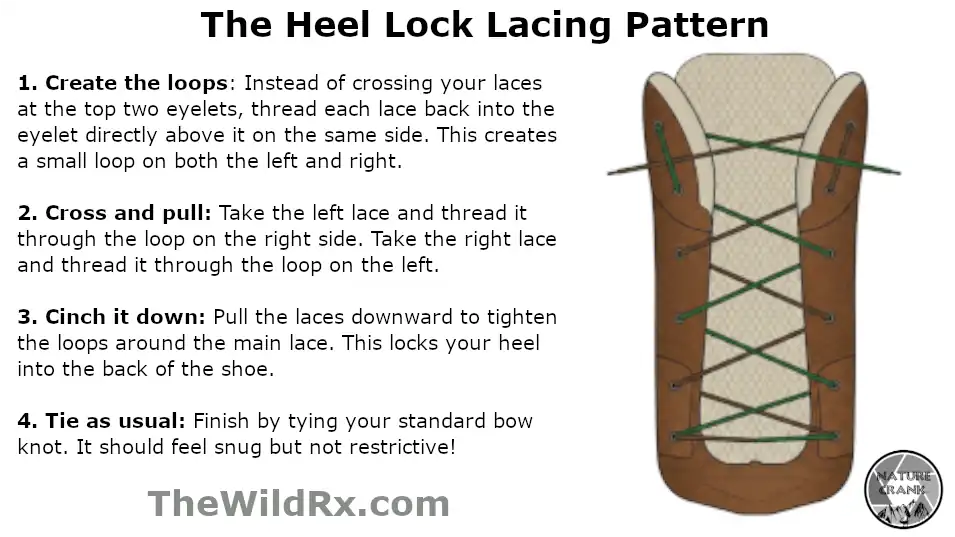
Watch: How to tie the heel lock lacing pattern
IT band syndrome in hikers
Iliotibial (IT) band syndrome is that sharp, “stabbing” pain on the outside of the knee. It usually happens when your glutes get tired, and your leg starts rotating inward on descents.
- Prevention: Clamshells and side-lying leg lifts are your best friends. Strong hips keep the IT band from getting cranky.
- On the trail: If it starts flaring up, take shorter steps and try to keep your weight centered.
- Recovery: Roll out your glutes and quads after the hike. Just a heads up: foam rolling for the first time usually involves some “colorful” language.
Hiker’s knee (patellofemoral pain)
Hiker’s knee is that dull ache behind the kneecap, especially on the way down. Your knees take a beating—absorbing up to 8 times your body weight on steep drops.
- The “soft” landing: Keep a slight bend in your knees. Never lock your joints out like a robot.
- Shorten the stride: Smaller steps mean less impact force.
- Pole power: Lean on those trekking poles to take the weight off your joints.
Other frequent hiking injuries to watch for
Beyond the blisters and knee problems, there are a few other trail gremlins waiting to snag you. Here is how to keep them at bay:
- Shin splints: This is that annoying, radiating ache along your shin bone. It usually screams at you when you’ve ramped up your mileage too fast, or you’re hiking in “dead” shoes that have lost their cushion. To avoid them, stick to the 10% rule for distance and make sure your footwear still has some bounce left. If they flare up, ice and rest are your only real friends—don’t try to “tough it out” or you might end up with a stress fracture (and nobody has time for that). I typically get shin splints (technically, anterior shin splints) going downhill when I haven’t hiked a steeper grade in a while. Basically, we are braking too hard. Focus on keeping your foot strikes quiet and light to reduce the impact.
- Ankle sprains: One loose rock is all it takes. Strengthen your ankles with balance exercises and wear supportive boots on technical terrain. If you do take a tumble, use RICE (Rest, Ice, Compression, Elevation) to manage the swelling. My physiatrist friend (a DO in physical medicine and rehab) told me that it’s best to use ice when the pain is acute, typically up to 72 hours later. But ultimately, getting some form of temperature therapy on the injury is better than ignoring it.
- Plantar fasciitis: That sharp heel pain during your first steps out of the tent is a classic sign of arch strain. Good insoles and regular calf stretches are the best way to keep your feet from revolting.
- Muscle strains and cramps: Dehydration is a sneaky culprit here. Keep your electrolytes topped up and give your muscles a proper warm-up before you start the big vertical climbs.
FAQ: Your hiking safety questions answered
Final tips for long-term trail health
At the end of the day, hiking is about enjoying the view, not counting how many Ibuprofen you have left in your pack. Injuries happen, but most of them are just the trail’s way of telling you that you skipped leg day or ignored a hot spot.
By prepping your body and your pack, you’ll spend way more time on the summits and way less time in the physical therapist’s office. Remember that the trail isn’t just for physical fitness; discover how hiking for depression and grief can actually help your brain heal while you walk. And if you’re a young whipper-snapper, just know the day will come when you have pain for no reason.
If you found these tips helpful (or if they saved your heels from a blister disaster), share this guide with your hiking crew! Whether you’re a weekend warrior or a thru-hiker in training, we all stay stronger when we share the knowledge. Have a favorite injury-prevention hack or a “don’t do what I did” story? Let’s help each other stay trail-ready.
Medical disclaimer
The information in this guide is for educational and informational purposes only and is not intended as medical advice. Hiking involves inherent risks, and individual physical conditions vary. Always consult with a qualified healthcare professional or physical therapist before starting a new exercise regimen or if you are experiencing persistent pain or a serious injury. Never disregard professional medical advice or delay seeking it because of something you have read on this website or anyone else’s.
Discover more from The Wild Rx aka NatureCrank™
Subscribe to get the latest posts sent to your email.