Navigation skills: Mastering map and compass basics alongside GPS tools
Learning solid navigation skills helps you explore trails confidently, whether on day hikes or longer backcountry trips. Relying only on phone apps or GPS can fail due to dead batteries, poor signal, or rough terrain. Combining traditional map and compass use with modern GPS tools—and knowing what to do if you get lost—builds real self-reliance outdoors.
We’ll cover the practical basics for beginners and intermediate hikers. It includes how to read topographic maps, use a compass, get the most from GPS devices, and handle situations when you lose your way.
If you spend enough time in the backcountry, your electronics will fail, or you will get temporarily misdirected. Learning basic navigation skills and remaining calm are vital for any adventurer.
Why strong navigation skills matter on hikes and outdoor trips
Getting disoriented happens even on marked trails, especially in bad weather, dense forest, or when side trails look tempting. Good navigation prevents minor detours from becoming emergencies. It also lets you venture off the beaten path safely and enjoy the outdoors more fully.
My first hike on the Appalachian Trail started with getting misdirected. What should be simple and straightforward isn’t always.
Key benefits of wilderness navigation
- Safety: Staying safe without depending on cell service.
- Efficiency: Saving time and energy by choosing efficient routes.
- Confidence: Building confidence for solo hikes or remote areas.
- Spatial awareness: Understanding terrain features like ridges, valleys, and streams.
Remember, phones can fail in many wilderness spots. Knowing how to use a map and compass is the primary fallback for any successful trek.
Choosing the right navigation tools for your adventures
The most reliable strategy is to carry more than one system. A standard kit often includes a physical map, a baseplate compass, and a GPS device or phone app as a backup.
Comparison of common navigation tools
| Tool | Pros | Cons | Best for |
| Paper topographic map | No batteries needed; shows full terrain context | Can tear or get wet if not protected | All trips, especially backcountry |
| Baseplate compass | Reliable, lightweight, works in any weather | Requires practice to use with map | Backup and taking bearings |
| Handheld GPS/Smartwatch | Shows exact position and tracks route | Battery drain; can fail in heavy cover | Tech-savvy users on long hikes |
| Phone apps (Gaia, AllTrails) | Convenient, high-detail offline maps | High battery use; screen glare | Day hikes with backup power |
Laminated maps or waterproof cases protect paper versions. Always carry spare batteries or a power bank for electronic tools to avoid the dreaded “black screen” in the middle of the woods.
Map and compass basics: Step-by-step for beginners
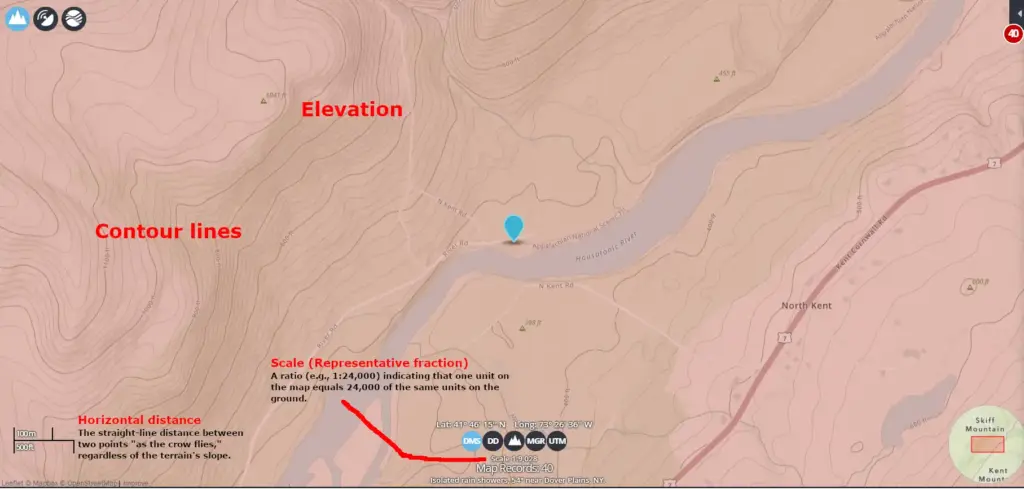
Start with topographic (topo) maps, which use contour lines to show elevation changes. Closer lines mean steeper terrain, while wide gaps indicate flat ground.
How to read a topo map
- Check the legend: Look for symbols representing trails, water, and vegetation.
- Note the scale: A 1:24,000 scale means 1 inch on the map equals 24,000 inches on the ground.
- Horizontal distance: The straight-line distance between two points “as the crow flies,” regardless of the terrain’s slope.
- Identify north: Locate the north arrow (usually found in the map margin).
- Use contour lines: Every fifth line is usually bolder (an index contour) with the elevation marked.
Basic compass skills
- Find magnetic north: Hold the compass flat and let the needle settle; the red end points to magnetic north.
- Orient the map: Place the compass on the map and rotate both until the needle lines up with map north.
- Adjust for declination: Many U.S. areas have a 10–20 degree difference between magnetic and true north. Adjust your compass bezel accordingly if your model allows it. You can check your declination on NOAA’s magnetic declination page.
- Take a bearing: Point the direction-of-travel arrow at your target, rotate the bezel so the “shed” (orienting arrow) aligns with the needle, then read the degree on the index line.
Pro-tip: When navigating (especially when there’s not a marked trail), always choose a large, easily identifiable point to guide to, such as a specific tall tree or mountain.
Using GPS tools effectively with traditional methods
GPS shines for pinpoint location and route tracking, but it works best when paired with map and compass knowledge. When comparing GPS vs map and compass for hiking, remember that GPS gives speed and distance easily, while maps provide the “big picture” perspective.
Tips for GPS navigation
- Download offline maps: Do this before leaving service areas. However, your phone may not always get a GPS signal due to the canopy and/or clouds. In addition, the accuracy could be way off. Phones will occasionally have software or hardware problems as well, which could lead to the inability to display the location properly.
- Set waypoints: Mark key points like trailheads, water sources, or campsites.
- Use tracking: Record your path so you can retrace your steps (breadcrumb trail).
- Cross-reference: Regularly check your GPS coordinates against your paper map to maintain situational awareness.
What to do if you get lost: Practical steps to stay safe
If you realize you’re disoriented, your brain’s first instinct is often to move faster—this is how people wander miles away from the search area. We’ve all been there, if only very briefly. Don’t panic. Staying calm is the most important rule. Instead, use the STOP method with these specific, tactical adjustments:
- S – Stop: Halt movement immediately and sit down. Drink water and eat a snack. This forces blood to your brain, lowering cortisol levels and helping you bypass the “flight” response.
- T – Think: Recall your last known position and route.
- The “last known” point: When was the last time you were 100% sure of your location? Was it a specific stream crossing, a weirdly shaped tree, or a trail marker?
- Time check: How long has it been since that point? If it’s only been 10 minutes, you are likely within a half-mile radius.
- O – Observe: Look for landmarks, trails, or mountain peaks. Listen for roads or rivers.
- Linear features: Look for “handrails” like ridgelines, power lines, or distant roads.
- The danger of water: While “follow water downstream” is common advice, it is often a trap. In steep terrain, streams can lead to cliffs or impassable thickets. Only follow water if you know it leads to a road crossing nearby.
- High ground: If safe, move up a few dozen feet to get a better vantage point, but avoid “summit fever” where you exhaust yourself climbing a peak.
- P – Plan: Decide whether to stay put or move carefully (only move if you have a clear destination and enough daylight).
- The “point of no return”: If you have less than two hours of daylight, stop trying to navigate. Your priority shifts from “getting out” to “staying warm.”
- Bailout directions: If you know a major highway runs North-South to the East of the entire park, use your compass to head East. I always find an emergency azimuth before I start hiking for the day. This can either be a physical feature in the land or a back azimuth.
- When to stay put: If you are injured, the weather is turning, or you have no clear idea of which way to go, stay put. Search and Rescue missions are statistically most successful when the subject remains near their last known point.
Tactical survival and signaling
- Think big and bright: Spread out a brightly colored rainfly or jacket in a clearing. SAR pilots look for colors that don’t exist in nature (like “blaze orange” or “signal blue”).
- The power of three: Three of anything is the international distress signal. Three whistle blasts, three flashes of a mirror, or three piles of rocks.
- Stay off the ground: If you have to spend the night, do not sleep directly on the earth; it will suck the heat out of your body. Use your backpack, branches, or dry leaves as insulation.
Inclusive safety: Navigation for everyone
Safety isn’t one-size-fits-all. If you are hiking with a group, ensure everyone—regardless of experience level—has a whistle and a basic map.
- For solo hikers: Your “Plan” phase should include checking your satellite messenger (like an inReach or Zoleo). If you have one, don’t wait until you’re dehydrated and shivering to hit the SOS button.
- For those with limited mobility: If moving through rough terrain to find a trail is risky, prioritize signaling and shelter-building immediately rather than trying to “bushwhack” out.
Extra navigation tips for better outdoor trips
- Share your plan: Tell a reliable contact your route and expected return time.
- Terrain association: Match what you see in real life (e.g., a ridge to your left) to the features on your map.
- Practice dead reckoning: Estimate the distance you have traveled by counting your paces.
- Natural cues: Use the sun (rises in the east, sets in the west) as a rough check, but do not rely on it for precise navigation.
Mastering back azimuths and panic azimuths
Even with a perfect plan, you may need to reverse course or find a “safety net” in the landscape. Being an infantryman, this was something important we quickly realized. These two techniques use simple math and large-scale structures to keep you on track.
How to use a back azimuth to retrace your steps
A back azimuth is the exact opposite of the direction you are currently traveling. Use this if you realize you’ve wandered off-trail and need to return precisely to your last known point.
- The 180-degree rule: Because a full circle is 360 degrees, your “return” direction is exactly 180 degrees away from your current heading.
- The math:
- If your current bearing is less than 180, add 180 (Example: 45 + 180 = 225 degrees).
- If your current bearing is more than 180, subtract 180 (Example: 250 – 180 = 70 degrees).
- Practical use: Before you leave a main trail to explore, take a bearing. When you want to return, calculate the back azimuth and follow it. It acts like a digital “undo” button for your path.
The panic azimuth: Your emergency safety net
A panic azimuth is a pre-determined bearing you choose before you start your hike. It is designed to lead you to a massive, unmissable feature that acts as a “catchment” if you get completely lost or your gear fails.
- Choose a linear structure: Look for a feature on your map that spans miles, such as a major highway, a massive river, or a long power-line clearing.
- Example: “I know Interstate 90 runs East-to-West along the entire northern edge of this park.”
- Set the bearing: If that highway is to your North, your panic azimuth is 0 degrees (North).
- When to use it: If you are disoriented and the “STOP” method hasn’t helped you find the trail, ignore everything else and follow your panic azimuth. You might not find your car, but you will hit that major landmark, which leads to safety and cell service.
- Think big: Don’t use a small creek or a single building. Use something so large that it is physically impossible to walk past it without noticing.
Pro-tip: Use handrails
In both cases, look for “handrails”—long features that run parallel to your path, like a ridgeline, a fence, or a valley floor. If you are following your back azimuth and see your handrail on the wrong side of you, you know immediately that you’ve drifted off course.
Frequently asked questions about navigation skills
Conclusion: Building your navigation confidence
Mastering map and compass basics alongside modern GPS tools is more than just a safety measure; it is the key to unlocking deeper wilderness experiences. By practicing these skills on local trails, you transform from a casual hiker into a self-reliant navigator capable of handling unexpected terrain or technology failures. Remember that the best navigation kit is the one you know how to use before the fog rolls in.
Share this guide with your hiking partners
Safety in the outdoors is a team effort. If you found these navigation tips helpful, please share this article with your hiking group or on social media. Helping others understand the fundamentals of map reading and the STOP method makes the trails safer for everyone.
How do you stay on track during your adventures? Leave a comment below with your favorite navigation app or a story about a time your compass saved the day.
Discover more from The Wild Rx aka NatureCrank™
Subscribe to get the latest posts sent to your email.