Why your RV water filter gives a false sense of security: TDS vs. bacteria (2026 update)
If you’re hitting the road in 2026, ensuring safe drinking water is your top priority. But, many RVers fall into a dangerous trap: relying on total dissolved solids (TDS) as a measure of safety. While a low TDS reading makes for great marketing, it is a poor indicator of whether your water is actually free from pathogens. It’s time to look past the digital screen and focus on what actually makes water drinkable.
This guide breaks down why your RV water filter might be prioritizing taste over health and how to choose a system that actually protects you from Legionella, E. coli, and other RV water system risks. These same rules apply to you for off-grid water filtration.
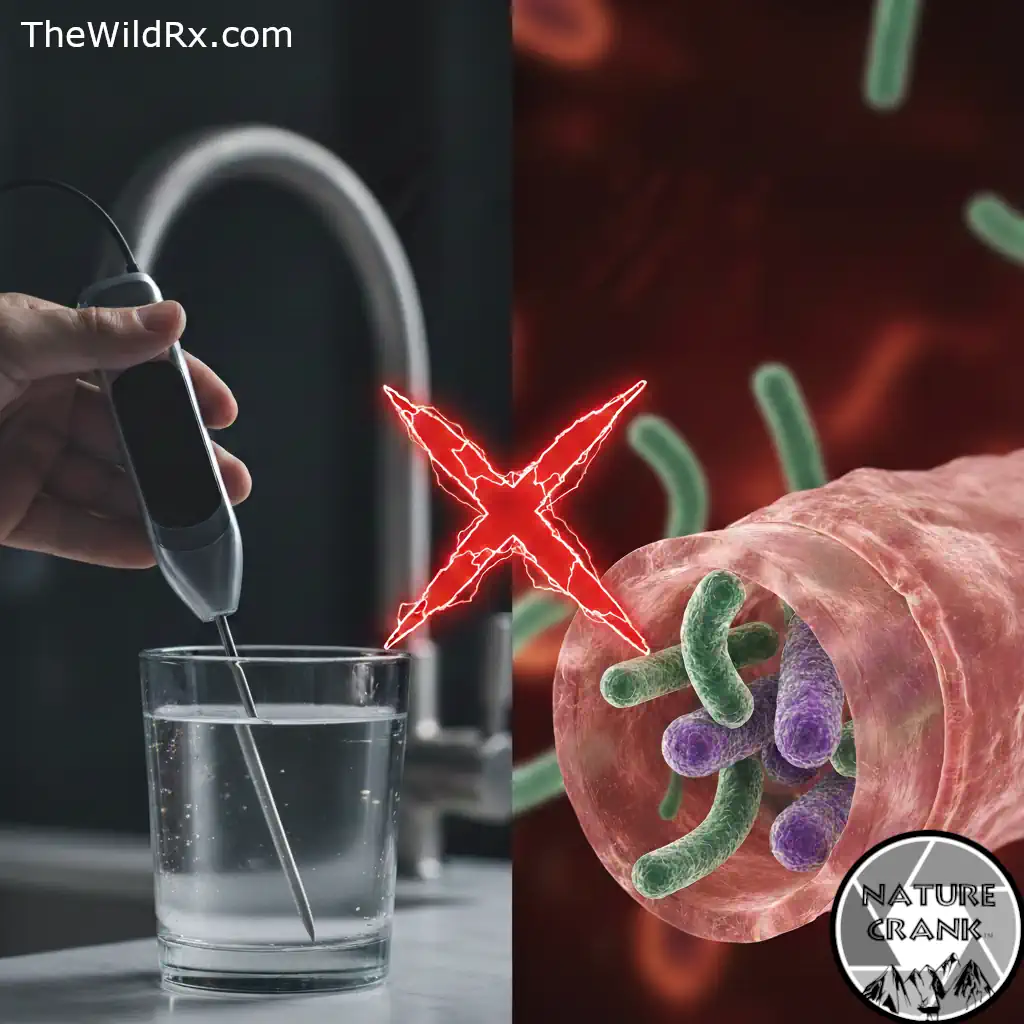
Key takeaway: A TDS meter measures minerals, not microbes. You can have near-zero PPM water that still contains life-threatening bacteria.
What is total dissolved solids (TDS) in water?
Total dissolved solids (TDS) represent the concentration of inorganic salts (calcium, magnesium, potassium, sodium) and organic matter dissolved in your water. Measured in parts per million (PPM), TDS levels vary wildly depending on your location:
- City tap water: 50–500 PPM
- Brackish/Estuary water: 5,000+ PPM
While the World Health Organization notes that TDS impacts the taste and “mouthfeel” of water, high TDS isn’t always a health hazard—it’s mostly a mineral measurement. Conversely, low TDS does not mean “clean” water. A TDS meter cannot detect lead, pesticides, or—most importantly—microscopic bacteria. It is not sensitive enough to detect heavy metals like lead at toxic ppb (parts per billion) levels.
The hidden dangers of bacteria in RV water systems
Unlike a home with constant water flow, RVs have ‘dead legs’ in the plumbing where water sits and warms up. This is a breeding ground for things a TDS meter will never see.
Legionella, for example, thrives in stagnant water between 35°C and 45°C. It becomes a major risk when you’re showering, as you can breathe in the bacteria through the steam.”
Common RV water pathogens:
- Legionella: Thrives in warm, stagnant water (35°C–45°C). It becomes deadly when aerosolized in your RV shower, leading to Legionnaires’ disease.
- E. coli and Giardia: Often introduced at poorly maintained campground pedestals or through contaminated hoses.
- Biofilm: A slimy layer of bacteria that sticks to the inside of your PEX tubing and fresh water tank, protecting pathogens from standard filtration.
TDS vs. bacteria: Quick comparison
| Feature | Total dissolved solids (TDS) | Pathogenic bacteria |
| What is it? | Minerals, salts, and metals | Living microorganisms (E. coli, etc.) |
| Detection method | Handheld TDS meter | Laboratory test or UV/growth strips |
| Health risk | Usually low (mostly taste/scaling) | High (nausea, pneumonia, infection) |
| Filter type needed | Reverse osmosis or distillation | UV, Ultra-filtration, or 0.2 Micron |
Common RV water filter misconceptions
Many travelers rely on “blue inline filters” sold at big-box stores. Here is the reality behind the myths:
- Myth 1: “My filter is 20 microns, so it’s safe.” A 20-micron filter is a sediment filter. Bacteria are much smaller (usually 0.2 to 2 microns).
- Myth 2: “The water tastes great, so it’s clean.” Bacteria are flavorless to humans. We are often tasting by-products of bacteria rather than the bacteria itself. In fact, many carbon filters remove chlorine (which kills bacteria) but don’t remove the bacteria themselves, essentially creating a “nursery” for microbes to grow inside the filter.
- Myth 3: “A TDS meter is a safety tester.” A TDS meter is a mineral tester. It is a helpful tool for checking RV hard water levels or RO membrane health, but it is useless for bio-safety.
More to follow below the video!
How RV water filters work: TDS vs. bacteria removal
To achieve safe RV drinking water, you must understand the two different “jobs” your filtration system performs.
1. Removing dissolved solids (TDS)
To lower TDS, you need Reverse Osmosis (RO). While RO systems remove bacteria, they are often impractical for full-flow RV use because they produce “waste water” (brine) and have a slow flow rate. They are best used as a dedicated drinking water tap.
Protip: RO systems require “dedicated tank sanitization” to prevent internal bacterial growth. They can grow bacteria if not used regularly.
2. Removing bacteria and viruses
For “whole-house” RV protection, you need mechanical or light-based purification:
- UV water purifiers for RVs: These use ultraviolet light to scramble the DNA of bacteria, making them harmless. They do not change the TDS.
- 0.2 Micron (Absolute) filters: These are physically small enough to “sieve” out bacteria.
- Nano-silver media: Some 2026 filters incorporate silver-impregnated carbon to prevent bacteria from growing inside the filter housing.
Why TDS reduction is often a marketing distraction
As boondocking and off-grid camping grow in popularity, many brands market TDS-reduction filters because the results are easy to show on a digital screen. However, these systems often use ion-exchange resins that swap minerals for sodium. While the “number” on your meter goes down, the biological safety remains the same.
If you are camping in remote areas or using “found water,” a low TDS reading provides a dangerous false sense of security.
Best RV water filter features for true bacteria protection
When shopping for an upgrade this year, look for these specific technical standards:
- NSF/ANSI 53 or 55 Certification: This is the gold standard for cyst and bacteria reduction.
- Absolute micron rating: Ensure the filter is rated at 0.2 microns absolute, not “nominal.”
- Flow rate: Ensure it can handle at least 2–4 gallons per minute (GPM) so your shower pressure doesn’t drop. Look for high-surface-area pleated filters to maintain water pressure (PSI) even at 0.2 microns.
- UV-C LED stages: The latest 2026 tech uses LEDs rather than mercury bulbs, offering instant-on protection without draining your battery.
How to maintain a sterile RV water system
Filtering water at the entry point is only half the battle. Use these steps to ensure your system stays clean:
- Seasonal sanitization: Flush your system with a bleach solution (1/4 cup per 15 gallons) every 6 months.
- Purge stagnant lines: If your RV sits for more than a week, flush the lines thoroughly before use.
- Use a dedicated “fresh” hose: Never use a garden hose; use a BPA-free drinking water hose.
- High TDS often indicates hard water, which requires an RV water softener, not just a filter.
Frequently asked questions about RV water safety
General RV water system maintenance checklist
Here is a general RV water system maintenance checklist designed for 2026 standards, focusing on both hardware longevity and biological safety.
1. Pre-trip / Seasonal start-up
- Deep sanitize the fresh tank: Use a mixture of 1/4 cup of unscented household bleach for every 15 gallons of water capacity. Fill the tank, run it through all faucets until you smell bleach, let it sit for 12 hours, then flush until the smell is gone.
- Inspect the “city water” check valve: Ensure the O-ring is seated correctly and there are no leaks where your hose connects to the rig.
- Check the anode rod (if applicable): If you have a Suburban water heater, pull the anode rod. If it’s more than 75% consumed, replace it to prevent tank corrosion.
Important note: Always remove water filter cartridges before adding RV antifreeze to the system.
2. Monthly hardware inspection
- Test your TDS levels: Use your TDS meter to establish a “baseline.” If your filtered water PPM suddenly jumps closer to the source water PPM, your filter media may be exhausted.
- Clean faucet aerators: Unscrew the tips of your faucets. You’ll often find “construction debris” or sediment that bypassed the main filter.
- Verify UV lamp function: If you have a UV-C LED or bulb system, check the indicator light to ensure the ballast or LED array hasn’t failed.
3. Filter replacement schedule
| Filter type | Frequency | Sign of failure |
| Sediment pre-filter | Every 3 months | Visible dirt/browning; drop in water pressure. |
| Carbon block | Every 6 months | Return of “chlorine” taste or sulfur smell. |
| 0.2 Micron / Absolute | Every 12 months | Significant flow restriction. |
| Reverse osmosis membrane | Every 2–3 years | TDS reading exceeds 15% of source water. |
| UV-C LED | Every 5–10 years | Indicator light shows failure (often red) |
4. Post-trip / Storage routine
- Drain the system: Never leave water sitting in your lines or water heater for more than two weeks. Drain the low-point drains and the fresh tank.
- Remove and dry filters: If storing for more than a month, remove your filter cartridges, drain the housings, and let the filters air dry (or discard if they are near their end-of-life).
- Cap your hoses: Screw your freshwater hose ends together or use dedicated caps to keep insects and bacteria from entering the hose during storage.
5. The “Boondocker’s Special” (Off-grid only)
- Sanitize your fill-hose: If you use a portable bladder or “jerry cans” to bring water to your RV, sanitize those containers with the same bleach ratio used for your main tank.
- Biofilm shock: If your water starts to smell like “rotten eggs,” you likely have a biofilm buildup in your PEX lines. You may need a Chlorine Dioxide-based “shock” treatment specifically designed for RVs.
RV water system sanitization chart
This chart uses the standard ratio of 1/4 cup of bleach per 15 gallons of water. For the smaller containers, I have converted the measurements into tablespoons and teaspoons for precision.
| Tank/Container capacity | Amount of liquid bleach | Measurement tip |
| 1 gal | ~1/4 tsp | A literal “splash” |
| 5 gal | 1 tbsp + 1 tsp | Common “Homer” bucket size |
| 10 gal | 2 tbsp + 2 tsp | Standard portable water jug |
| 15 gal | 1/4 cup (4 oz) | Small camper/Van-life tank |
| 30 gal | 1/2 cup (8 oz) | Travel trailer average |
| 50 gal | 3/4 cup + 2 tbsp | Standard Class C tank |
| 75 gal | 1 1/4 cups | Large Fifth Wheel tank |
| 100 gal | 1 2/3 cups | Class A Motorhome average |
| 120 gal | 2 cups (16 oz) | High-capacity Class A |
| 150 gal | 2 1/2 cups | Luxury Adventure rig |
| 200 gal | 3 1/3 cups | Industry Max (Super C / Custom) |
Pro-tips for 5 & 10 gallon containers
If you are using these smaller containers to “port” water into your RV while boondocking, follow these safety steps:
- The “Clean Hookup”: Even if you sanitize your 10-gallon jug, a dirty funnel or a hose that has been laying on the ground can re-introduce bacteria. Sanitize your transfer tools every time.
- Airlock Prevention: When pouring from a 5-gallon bucket into a gravity fill, pour slowly. If air can’t escape the tank, it will “burp” the bleach-water back onto your clothes.
- Chlorine Evaporation: If you leave a 5-gallon bucket of chlorinated water sitting open in the sun, the chlorine will evaporate in a matter of hours, leaving the water unprotected. Always keep your portable containers tightly capped.
Understanding the 2026 “Biofilm” challenge
In recent years, the industry has seen an increase in biofilm—a protective “slime” that bacteria build to survive chlorine. If you have sanitized your tank but the water still smells “off” after a few days, the bacteria might be hiding under a biofilm layer. In this case, you may need a Chlorine Dioxide treatment, which is more effective at penetrating that slime than standard bleach.
Advanced sanitization: Beyond standard bleach
- Biofilm Penetration: It effectively “shocks” the system, removing the sulfur smell (rotten eggs) that bleach often leaves behind.
- No “Bleach Taste”: It leaves significantly less chemical residue and taste after flushing.
- Higher Potency: It is up to 2.5 times more effective at killing pathogens like Cryptosporidium and Giardia than standard bleach.
2026 Shock Treatment Guide: ClO2 Tablets/Purogene
Most RVers use either Purogene (Liquid) or Safrax/Aqua Mira (Tablets). Here is how to perform a deep “biofilm shock” on your system:
1. Dosage Requirements
| Method | Maintenance Dose | Shock/Biofilm Dose (Deep Clean) |
| Purogene (Liquid) | 1 oz per 30 Gallons | 3 oz per 10 Gallons |
| Safrax (1g Tablets) | 1 tablet per 25 Gallons | 1 tablet per 1 Gallon (25 PPM) |
2. The “Shock” Procedure
- Bypass Filters: ClO2 is highly reactive. Remove all carbon filters and bypass your UV light or Reverse Osmosis system before starting.
- Mix the Solution: * For a 100-gallon tank, use 30 oz of Purogene or 100 tablets.
- Pre-mix with 5 gallons of water in a bucket before pouring into your gravity fill or siphoning into your “City Water” inlet.
- Run the Lines: Turn on your water pump. Open every faucet (hot and cold) until you smell the distinct, swimming-pool-like scent of ClO2.
- Dwell Time: * For a standard deep clean: 1 Hour.
- For severe biofilm/rotten egg odor: 3 to 4 Hours.
- Drain and Flush: Drain the tank completely. Refill once with fresh water and run it through the lines. Because ClO2 breaks down into simple salts and oxygen, it usually only requires one flush (unlike the 3-4 flushes often needed for bleach).
Summary Comparison: Bleach vs. Chlorine Dioxide
| Feature | Standard Bleach | Chlorine Dioxide (ClO2) |
| Best For | Routine seasonal sanitizing | Biofilm removal & stagnant water |
| Taste/Odor | Strong; hard to flush out | Mild; flushes out quickly |
| Biofilm Kill | Poor (acts as a surface kill) | Excellent (penetrates the slime) |
| Corrosiveness | High (can affect seals over time) | Low (safer for RV plumbing) |
| Cost | Very Cheap ($5/gallon) | Moderate ($20–$40 per treatment) |
Pro-Tip for 2026 Boondockers
If you frequently fill up from “unverified” sources (creeks, hand pumps, or questionable campground wells), keep a bottle of ClO2 maintenance tablets in your rig. Adding 1 tablet per 25 gallons every time you fill up provides a safe residual that prevents biofilm from ever forming in the first place.
What’s in your water bay right now? Most of us started our RV journey with the “standard” blue inline filter, only to realize later it wasn’t doing the heavy lifting. I’m curious—have you made the switch to UV-C or 0.2-micron filtration yet, or are you still relying on a TDS meter?
Drop a comment below and let us know what your current setup is—or ask a question if you’re looking to upgrade!
Discover more from The Wild Rx aka NatureCrank™
Subscribe to get the latest posts sent to your email.